Hi Everyone, I hope its ok to post this here, only recently joined.
I’ve embarked on a mission to restore back to working order an old Hewlett Packard 7980 9-track tape drive unit (manuf: 1988) Currently, it’s out of action with a power supply short somewhere blowing the AC line fuse.
Diagnosis continues - no obvious blowouts, bulges, scorches or any over visible signs of damage, boards look in great condition actually, however I’ve never seen so many RIFA caps on a single board in my life - No less than 9. They’ll all be replaced to avoid the magic smoke in due course before reassembly.
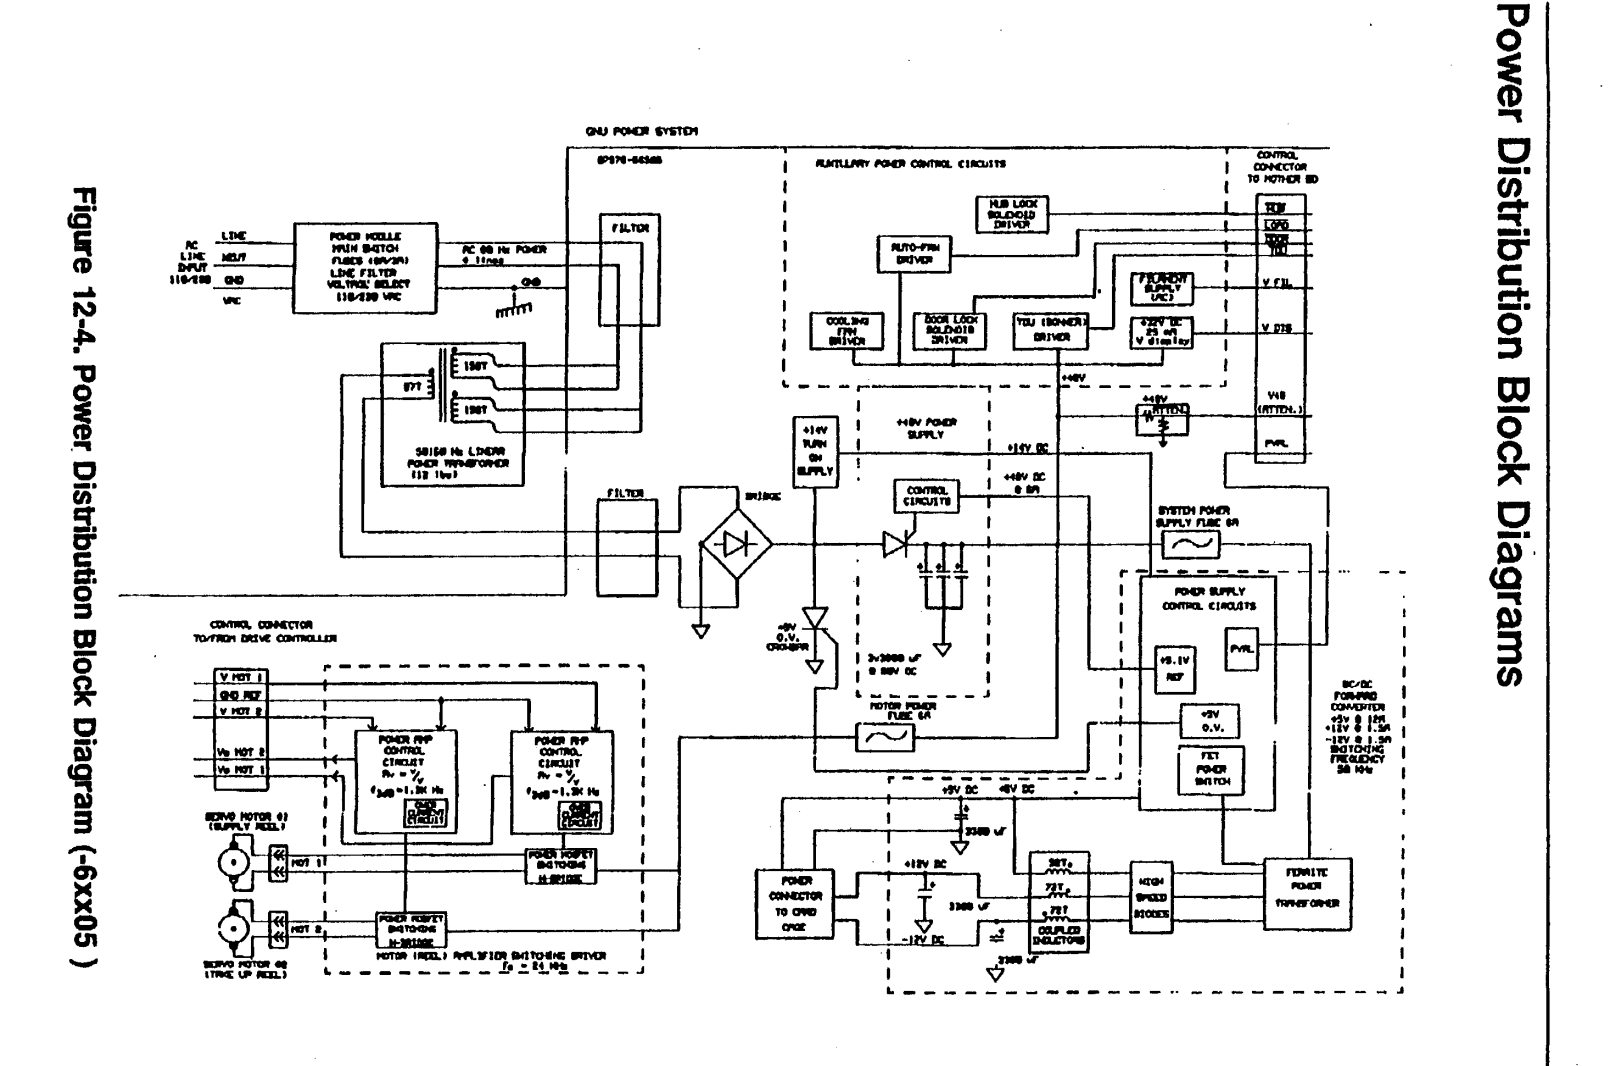
Now to my callout to community, so far I have struggled to find a good scan of the service manual with the schematics. The easily located copies up on bitsavers and archive.org all appear to be equally fuzzy and it’s almost impossible to read the schematics with any detail. Hoping someone here might have a better source or idea which other forums might be able to assist with a clear scan.
Thanks Adrian, I have so far checked all diodes and the MOSFETs for shorts and nothing indicating so far. The search continues, unfortunately a bit slowly due to workload in the day job and a busy few weekends.
I’ve decided to take a very methodical approach to avoid blowing up anything further and use as a learning experience as I have some other machines in the queue after this one to repair/restore. I have a reasonable working knowledge of basic electronics but troubleshooting power supply shorts still a bit of a challenge after the obvious things checked.
Done so far:
Checked all diodes with DMM diode test mode - all reading about 4.5 V drop forward, no shorts
Checked all the components mounted to the heatsink for shorts - none showing short (If I remove those onboard fuses, I do see a short with the fuse still inline)
I believe something downstream of that fuse is where short is. Fuse connects to that TDK Transformer and then the 4 diodes just nearby.
Next steps as I see (Happy to hear advice from experts here):
Have ordered an ESR meter to check all those caps in circuit, awaiting delivery
Replace all those RIFAs / X & Y filter caps and anything the ESR meter picks up.
and take it from there…
Any thoughts on running this through a dim-bulb tester if the above doesn’t work?
Im unaware of any ESR meter that can test capacitors in circuit. It is theoretically impossible to my understanding.
I would suggest all caps, including the AC line capacitor is replaced as a matter of course and safety in the case of the Line filter - be ware to replace it like for like with an X or Y series. If it is a Y series, it could be your problem.
My Sun badged HP 88780 mag tape drive is similar to your 7980 tape drive. Mine had a shorted diode in the primary AC bridge, so it also blew the AC line fuse.
You could connect the power supply to a Variac and send just a little AC voltage to the power supply. Enough voltage to find the part that gets warm, but not enough to blow the fuse.
HP sold their tape drives to lots of manufacturers, You might be able to find an HP maintenance manual from a different manufacturer.
Thanks and please excuse a slow reply. Family, travel and work ahead of hobbies I’m afraid.
Firstly the good news. I have managed to identify a failed (shorted) filter capacitor. One of the 3 big cans near the transformer secondary. This would definitely result in the fuse-blowing failure I am seeing. Not sure how I missed this in the first pass, was focusing on transistor and diode testing I guess and missed the easy diagnosis.
Now waiting on replacements to arrive and fingers crossed there is no downstream damage.
You are right about the rebadging, Looks like Sun 9914 and M4 Data 9914 or 9905 are very similar close cousins and the service manuals all look almost identical, just different layouts.
Thanks for all the help so far on here. I will report back once tape is streaming !
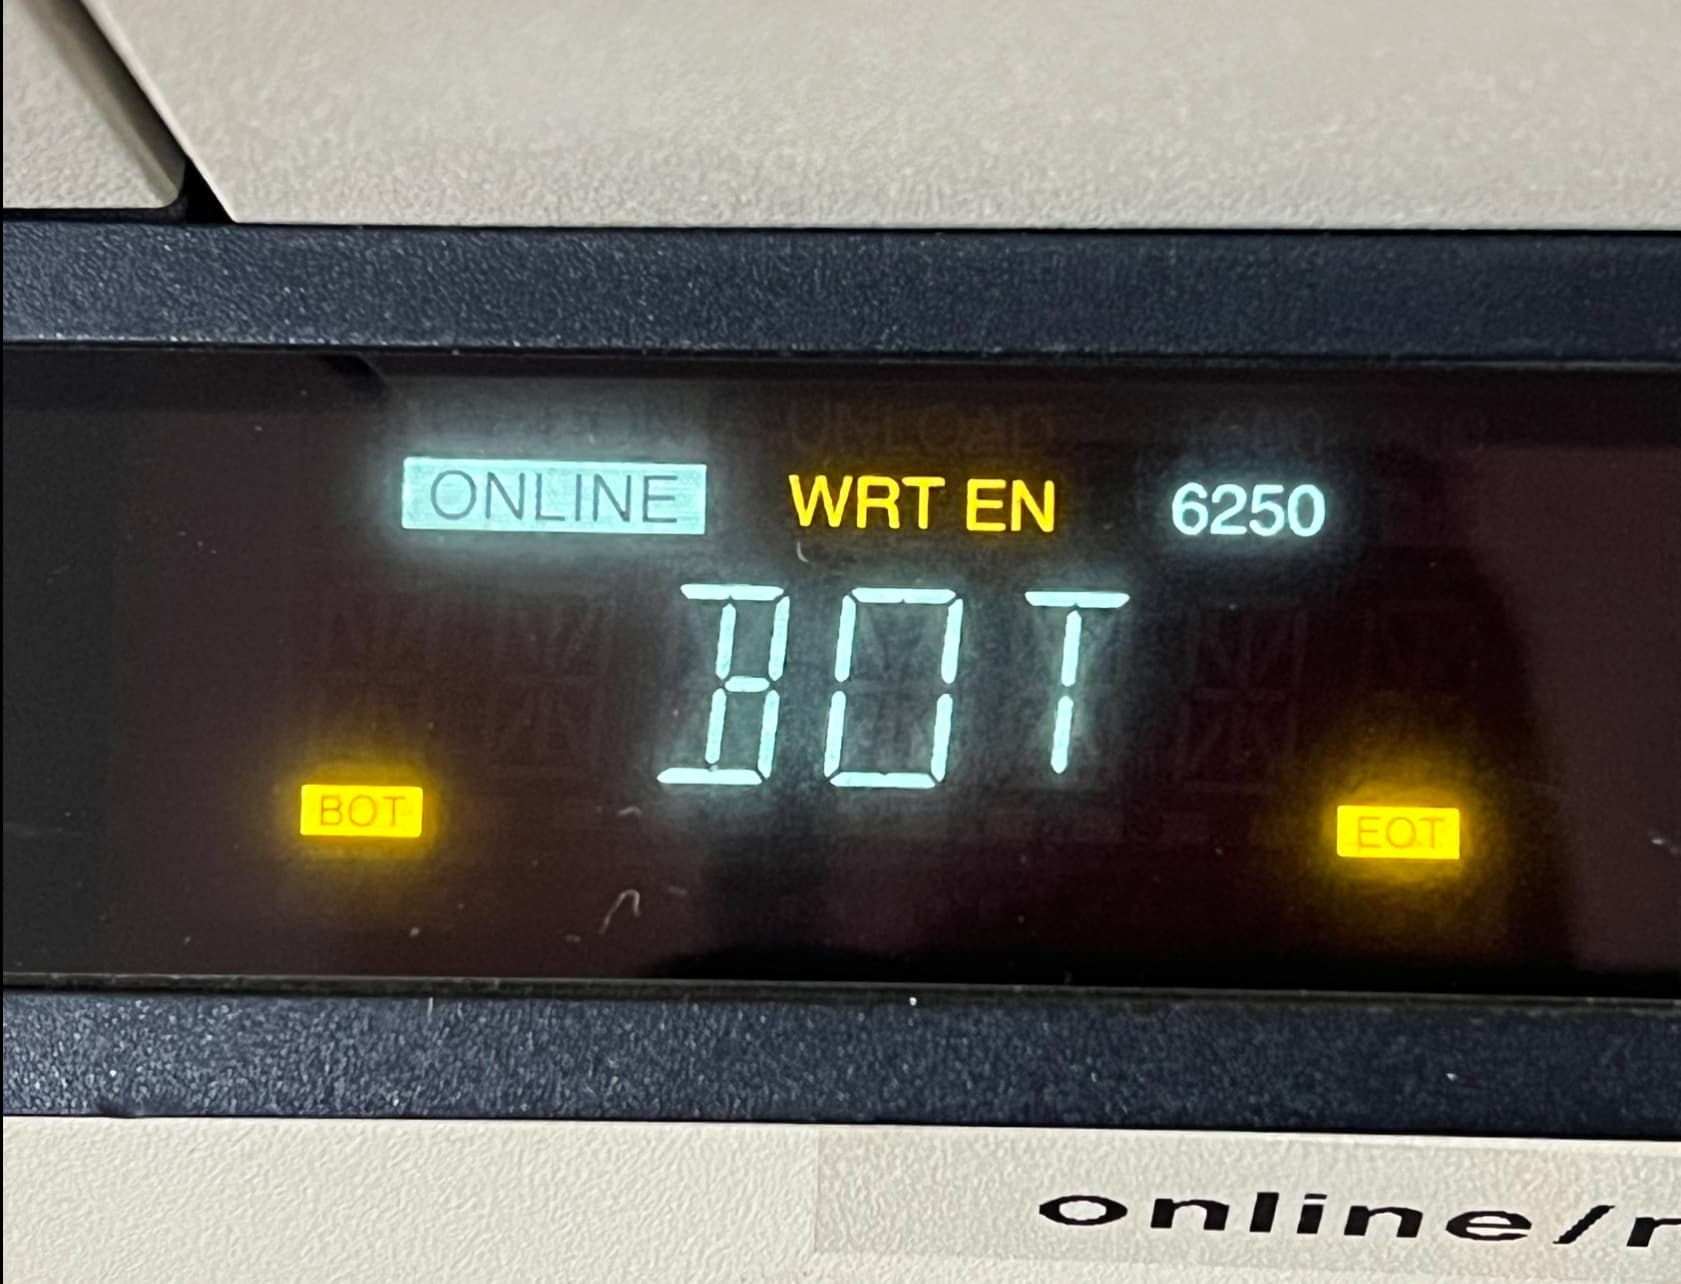
Good progress made this morning on the HP 7980 resurrection. Short now fixed and we have tape movement. Mechanically all seems well with one issue still to diagnose - a couple of operator panel buttons not working it seems, making it difficult to load/unload/test. With a tape loaded from the top cover open, the magical air-powered autoload even works and tape gets to BOT marker.
I can’t do anything more now until I hook up the SCSI and hopefully get some read/write testing done from the Sparc-20 (only SCSI box I have currently).
Then I guess I’m opening her up again to see if I can fix the front panel issue.
Tape air-powered autoload is a piece of engineering genius if you haven’t seen it before!
Hi Adrian,
Yes progress made thankfully but slightly stalled for the moment.
The good news as I see it is that I THINK all boards and hardware are functioning and my problem may be just tape related. But the jury is still out until I source another tape - perhaps someone in the community can advise the best way to get a “known good” or recertified tape. I’ve checked online and they’re in the hundred $AUD plus range.
Front Door Jamming
Front door jammed issue is resolved. Thankfully this merely involved pulling the front panel off and re-installing. Whatever was jammed has unjammed itself and door working beautifully.
Keypad buttons not working
This is largely resolved and all keys functioning. You still have to press more firmly than i’d like on some keys but I think the issue was just down to lack of use and oxidation of contacts perhaps. It’s not perfect and might benefit from a contact cleaner spray when I get around to it but for now all keys are usable. Which is awesome as thats how all the test sequences are initiated and error codes revealed.
Read-Write errors and Test Fails
This is where things are still interesting and not fully resolved. But progress has been made.
There two issues I was having problems with resulting in test fails.
Sticky Tape Syndrome - This was causing tape transport to abort as tape was sticking to the heads and/or cleaner block every time as I found out after a lot of trial and error. That sticky description is no joke. It sticks TIGHT and you really have to peel it away carefully. Very surprising how easily it jams when the tape is in this condition. You can’t tell by looking. An indicator I should have picked up on earlier was high pitched squeal under fast forward and rewind. One tape is even shedding material as it winds, not good.
I have only two tapes (one came with unit and one I bought on ebay) and both were having the same issue. Partially resolved by attempting a “tape bake” - baked in oven at 55 degrees C for 4 hours but I have read elsewhere you are better to do 24 hours in a dehumidifier which I don’t have. Any advice from the crew here gratefully accepted.
Tape Read/Write test failure.
This is still an issue but I did have a small breakthrough. There is still a chance I have a tape head issue or both tapes I have are still no good. Maybe a bit of both.
I discovered I can successfully run a tape ID write test one of the tapes at a lower BPI (800 BPI instead of 1600 - I think those are the numbers). So I think that gives hope that it both wrote and read at least some tiny piece of data near the BOT marker. I thought that was very promising.
I have full notes on all the test passes and fails still occuring at home and happy to share if anyone things relevant.
Most of my testing is through in-built tests through the front panel. I have hooked up the Sparc 20 and the interface looks fully functional. Pretty much everything I have tried requires the read-write to be functional - line “tar” and “mt” operations.
Next Steps
My plan is to source a known good tape somewhere - either a “recertified” tape from an actual tape supplier (seems to be a couple around online in the US I think) or brand new tape stock. Also seems to be a supplier.
Other expenses have had to be prioritised at home so spending $150 - $200 on a test tape is down the list a bit. But hopefully soon.
I haven’t given up - it will take some time but pretty determined to get this thing running fully.
Excuse the long-winded update. Thanks for reaching out Adrian, I have been meaning to give an update.
@DaveEverett - this is the thread. @mdtapp@m_thompson we are trying to get a Data General based on the HP 7980S running but after the second or third power up it lost Display.
After almost a year of on and off tinkering in whatever spare time I could muster, I now have the 7980 properly working today.
I’ll comment on the Data General post in a moment but just to complete my update first: Success after the following work and a lot of trial and error.
Getting a decent tape that hasn’t suffered the dreaded sticky shed syndrome. On my 3rd attempt I recently received a tape in pretty good condition - good enough to read/write.
Undertaking many of the built-in diagnostic tests. You have to hand it to HP and tech from that era. The diagnostics are brilliant. After many runs of “exerciser” tests, things started to loosen up and tests started succeeding more than failing. For future reference these are test numbers 100, 101, 102, 103 and 99. These really give the tape transport a good thorough workout.
After some intense bearing squeal from the tape speed sensor and the tensioner arm spindle, I removed and gave them a minor service getting a micro amount of bearing oil into both. Not perfect but much smoother and no sign of oil escape.
I now have my Sparc20 successfully doing tar’s writing and reading back. My 7980 is a SCSI version so very easy hookup.
Further potential issues:
Still some concerning sounds from the tape speed sensor at high speed rewind speeds. This only just started today so I hope the bearing isn’t on the way out. Hopefully the tiny new bit of oil may work its way through.
Occasionally getting “CHECK” message on the display which I suspect are some soft error retries.
Anyway thats my update after a long pause waiting for motivation and finding a good tape.
Next steps - I may try to get working under Linux or Windows but that can wait.
Happy Easter and thanks for your interest
Hi @DaveEverett, @m_thompson , I’ve love to help you guys with your troubles if I can. Let me know more and maybe we can chat further about the issue you’re having.
@mdtapp - @DaveEverett can better explain but basically we found a Data General SCSI tape drive in the collection, after a few power ups it seemed to be working fine. It even dropped the door to load a tape,
But then soon after the display disappeared and have not got it back/ the drive doesn’t necessarily seem to be working headless as sometimes the display comes back on but it’s just all lit up.
Lifting the emergency lid does cause the drive to spin.
I had connected it to a scsi device as the issue started but it was a non powered ZuluSCSI board just to see if it was recognised- I really believe it was malfunctioning before but I’ve read about a diode blowing due to dual termination power…
Any chance you can see if your unit provides video on the screen with the SCSI board at the back disconnected?
We also noted there is 4 LED lights on the second board in the upright expansion- -12 +12 +5 and reset.
Hi guys,
My 7980S runs just fine headless without SCSI connected and I’ve been running my unit like that for all the built-in tests.
I had some trouble with front panel buttons but really just electrical contacts probably needs deoxing. They work but need to press harder than normal.
You asked about the upright boards (PCA’s) and yes all 4 LED’s are lit on mine - I noticed them yesterday when diagnosing mine, so that appears normal.
The dead front LCD panel seems the main concern as I am pretty sure the buttons and display would all use the same PCA board.
The 7980 service manual on bothers has very good descriptions of all the internal boards.
I’m out for the day but back home tonight if you need me to check anything.
Also worth noting that you can load tapes through the top cover just the same as the front load panel. Do you have a tape?
Just closing the lid should initiate auto load. If that’s not working then the boot process may have failed I’m guessing.
Hi Adrian,
I’ve disconnected the SCSI board completely (power and ribbon cable) and done a power-up.
I get front display still so seems different to your symptom.
Display goes to “TESTING” and then “FAIL 0” about 10 seconds after power up.
Its pretty much dead from that point.
The other thing that happens on a normal boot is that it will try to load whether there is a tape inserted or not. So after about 20 seconds the display goes to READY and you will hear the tape load blower wind up and the front hub will start moving. I took a video of startup if that’s of any help.
Images attached showing display when SCSI interface disconnected…
Also, have you checked/reseated both ends of the ribbon cable that goes from the front panel assembly to the main “mother” PCB at the bottom of the vertical riser cards?
That would be where front panel display power is coming from. Worth a look.
There is also a small front-panel PCB inside the front cover that is removable and may be worth checking for obvious component damage.
Just a warning if you remove the front cover, the top plastic lid should be lifted up first otherwise you can damage the door-close microswitch lever.
Service manual section 6-2 covers the front panel area. 07980-90030_88780Svc_Oct91.pdf